
When it comes to planning your Easter feast, you might find yourself in need of some fresh ideas. You can't go wrong with a Honey Glazed Ham that balances sweetness with savory notes, perfectly complemented by Creamy Scalloped Potatoes. As you think about sides, consider a vibrant Spring Vegetable Salad that adds a splash of color to your table. But what about desserts? There's more to investigate that could enhance your gathering. Let's uncover the standout dishes that will impress your guests and make this holiday truly special.
Honey Glazed Ham
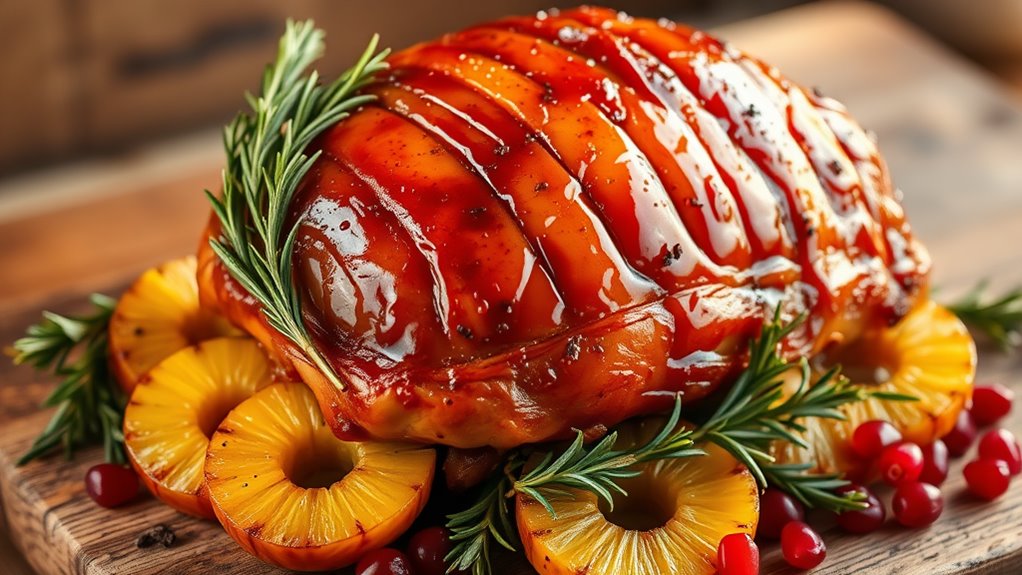
Honey glazed ham is a classic dish that brings warmth and joy to any Easter celebration. The sweet and savory glaze beautifully complements the rich flavor of the ham, making it a centerpiece that's bound to impress your family and friends.
Whether you're hosting a large gathering or enjoying a quiet dinner at home, this recipe is simple yet delicious, allowing you to create a memorable meal with minimal effort.
Ingredients:
- 1 fully cooked bone-in ham (about 8-10 pounds)
- 1 cup honey
- 1 cup brown sugar
- 1/4 cup Dijon mustard
- 1/4 cup apple cider vinegar
- 1 teaspoon ground cloves
- 1 teaspoon ground cinnamon
- 1/2 teaspoon black pepper
- 1/2 teaspoon salt
- Whole cloves (for studding the ham)
Instructions:
Preheat your oven to 325°F (160°C). Score the surface of the ham in a diamond pattern and stud it with whole cloves.
In a medium saucepan, combine the honey, brown sugar, Dijon mustard, apple cider vinegar, ground cloves, cinnamon, black pepper, and salt. Heat over medium heat until the sugar has dissolved and the mixture is smooth.
Place the ham in a roasting pan and brush generously with the glaze. Cover the ham loosely with aluminum foil and bake for about 1.5 to 2 hours, basting it with the glaze every 30 minutes.
Remove the foil for the last 30 minutes of cooking to allow the glaze to caramelize and develop a beautiful golden color.
Extra Tips:
For the best flavor, allow the ham to come to room temperature before cooking. This helps ascertain even heating throughout.
If you want an extra layer of flavor, consider adding a splash of orange juice or a tablespoon of Worcestershire sauce to the glaze.
Keep an eye on the ham as it cooks; if the glaze begins to darken too quickly, cover it with foil to prevent burning.
Leftover ham can be stored in the refrigerator and makes for delicious sandwiches or casseroles, ensuring you can enjoy this delightful dish long after the holiday is over.
Creamy Scalloped Potatoes

Creamy scalloped potatoes are a classic side dish that adds a rich and comforting touch to any Easter feast. This dish features layers of thinly sliced potatoes enveloped in a luscious cream sauce, baked to golden perfection.
The combination of creamy, cheesy goodness and tender potatoes makes it a favorite for family gatherings. Whether served alongside ham, lamb, or roasted vegetables, creamy scalloped potatoes are sure to please a crowd.
Ingredients:
- 4 large russet potatoes, peeled and thinly sliced
- 2 cups heavy cream
- 1 cup shredded sharp cheddar cheese
- 1 cup grated Parmesan cheese
- 3 cloves garlic, minced
- 1 teaspoon salt
- 1/2 teaspoon black pepper
- 1/2 teaspoon dried thyme
- 1 tablespoon fresh parsley, chopped (for garnish)
- 2 tablespoons butter (for greasing the baking dish)
Instructions:
Preheat your oven to 375°F (190°C) and grease a 9×13-inch baking dish with butter.
In a large bowl, combine the heavy cream, minced garlic, salt, pepper, and thyme. Layer half of the sliced potatoes in the bottom of the prepared baking dish, followed by half of the cream mixture and half of the cheddar and Parmesan cheeses.
Repeat the layering process with the remaining potatoes, cream mixture, and cheeses. Cover the dish with aluminum foil and bake for 45 minutes, then remove the foil and bake for an additional 25-30 minutes, or until the potatoes are tender and the top is bubbly and golden.
Extra Tips:
For the best results, try to slice the potatoes as evenly as possible for uniform cooking.
You can also experiment with different cheeses, such as Gruyère or mozzarella, to customize the flavor profile. If you prefer a lighter version, you can substitute half-and-half for the heavy cream.
Allow the dish to rest for about 10 minutes after baking before serving; this helps the layers set and makes for easier slicing. Garnish with fresh parsley for a pop of color and added freshness before serving. Enjoy your creamy scalloped potatoes!
Spring Vegetable Salad

Spring Vegetable Salad is a vibrant and invigorating dish that celebrates the season's bounty. Utilizing a mix of fresh, crisp vegetables, this salad isn't only visually appealing but also packed with nutrients. Perfect as a side dish for your Easter meal or as a light main course, it can be customized with your favorite vinaigrette or toppings. Enjoy the flavors of spring while adding a burst of color to your table.
Ingredients:
- 2 cups mixed greens (arugula, spinach, or spring mix)
- 1 cup cherry tomatoes, halved
- 1 cup cucumber, diced
- 1 cup radishes, thinly sliced
- 1 cup asparagus, blanched and cut into bite-sized pieces
- 1/2 cup red onion, thinly sliced
- 1/4 cup feta cheese, crumbled
- 1/4 cup olives, pitted and sliced
- Olive oil
- Balsamic vinegar
- Salt and pepper to taste
To prepare the Spring Vegetable Salad, start by washing and drying the mixed greens and placing them in a large salad bowl.
Add the cherry tomatoes, cucumber, radishes, asparagus, and red onion on top of the greens. Gently toss the vegetables together to combine.
Drizzle olive oil and balsamic vinegar over the salad, and season with salt and pepper to taste. Toss the salad again to guarantee all the ingredients are evenly coated.
Finally, sprinkle the feta cheese and olives over the top for added flavor and texture.
When making this salad, feel free to experiment with different vegetables based on what's in season or what you have on hand.
You can also add protein such as grilled chicken, chickpeas, or quinoa to make it a heartier meal.
For an extra layer of flavor, consider adding fresh herbs like basil or parsley, or even a squeeze of lemon juice for brightness.
Remember to serve the salad immediately after dressing it to keep the greens crisp and invigorating.
Lemon Tart With Berries

Lemon Tart with Berries is a delightful dessert that combines the zesty brightness of lemon with the sweetness of fresh berries, making it a perfect treat for your Easter celebration.
This tart has a buttery, flaky crust that encases a smooth and creamy lemon filling, topped with an array of vibrant berries that add both flavor and visual appeal. Easy to make, it can be prepared in advance, allowing you to enjoy more time with family and friends during the holiday festivities.
Ingredients:
- 1 ½ cups all-purpose flour
- ½ cup unsalted butter, chilled and cubed
- ¼ cup powdered sugar
- 1 large egg yolk
- 3 large eggs
- 1 cup granulated sugar
- ½ cup fresh lemon juice (about 2-3 lemons)
- Zest of 1 lemon
- 1 cup mixed fresh berries (strawberries, blueberries, raspberries)
- Whipped cream (optional, for serving)
Instructions:
To make the lemon tart, start by preheating your oven to 350°F (175°C).
In a large bowl, combine the flour and powdered sugar, then cut in the chilled butter until the mixture resembles coarse crumbs.
Add the egg yolk and mix until the dough comes together. Press the dough into a 9-inch tart pan and prick the bottom with a fork.
Bake the crust for 15 minutes, or until lightly golden.
Meanwhile, in another bowl, whisk together the eggs, granulated sugar, lemon juice, and lemon zest until smooth.
Pour the lemon filling into the pre-baked crust and return to the oven for another 20-25 minutes, or until the filling is set.
Allow the tart to cool completely before topping it with fresh berries.
Extra Tips:
For the best flavor, use freshly squeezed lemon juice and avoid bottled versions.
You can also experiment with different types of berries based on what's in season or your personal preference.
If you like a sweeter tart, consider adding a bit more sugar to the lemon filling, but remember to balance it with the tartness of the lemons.
When serving, a dollop of whipped cream can elevate the experience and add a creamy texture that perfectly complements the tartness of the lemon and the sweetness of the berries.
Enjoy your delicious lemon tart!
Chocolate Easter Egg Nest Cookies

Chocolate Easter Egg Nest Cookies are a delightful treat that combines the rich flavor of chocolate with the fun of Easter candy. These cookies aren't only delicious but also visually appealing, making them perfect for your Easter celebrations.
With a crunchy exterior and a soft center, they're topped with colorful chocolate eggs that resemble nests, sure to bring joy to both kids and adults alike. Let's get started on making these festive treats!
Ingredients:
- 1 cup unsalted butter, softened
- 1 cup granulated sugar
- 1 cup brown sugar, packed
- 2 large eggs
- 1 teaspoon vanilla extract
- 2 cups all-purpose flour
- 1 cup cocoa powder
- 1 teaspoon baking soda
- 1/2 teaspoon salt
- 2 cups shredded coconut
- 1 cup chocolate Easter eggs (mini or regular)
Instructions:
In a large mixing bowl, cream together the softened butter, granulated sugar, and brown sugar until light and fluffy.
Beat in the eggs one at a time, followed by the vanilla extract.
In a separate bowl, sift together the flour, cocoa powder, baking soda, and salt.
Gradually blend the dry ingredients into the wet mixture until fully combined.
Fold in the shredded coconut to add that nest-like texture.
Preheat your oven to 350°F (175°C) and line a baking sheet with parchment paper.
Drop spoonfuls of dough onto the prepared sheet, leaving space between each cookie.
Use your thumb or the back of a spoon to create a small well in the center of each cookie.
Bake for 10-12 minutes, then remove from the oven and gently press chocolate eggs into the center of each cookie while they're still warm.
Allow them to cool completely on a wire rack.
Extra Tips:
For a more intense chocolate flavor, consider adding chocolate chips to the dough.
If you want to make these cookies even more colorful, feel free to mix in some pastel sprinkles along with the chocolate eggs.
Additionally, if you prefer a crunchier cookie, bake them a couple of minutes longer, but keep an eye on them to avoid burning.
These cookies can be stored in an airtight container for up to a week, making them a great treat to prepare in advance for your Easter festivities.
Enjoy your baking!